[Guide] Increase max characters posting count limit for self-hosted Mastodon server

- Posted in Guides by

If you search for the max_characters keyword in the Mastodon Github repository, you will see that it all points to the value within the StatusLengthValidator and a variable called MAX_CHARS.

MAX_CHARACTERS_LOCAL  = 255

To modify it, first, ssh into your Mastodon server, and switch to the root shell:

sudo -s

Then, switch to the Mastodon user

su - mastodon

Now, modify the validator file:

nano -w live/app/validators/status_length_validator.rb

At the very top of the file, you will see the MAX_CHARS variable, which was by default 500, you can modify it to another integer, for example 3000 to allow a maximum of 3000 characters within each post.

class StatusLengthValidator < ActiveModel::Validator
  MAX_CHARS = 3000
  URL_PLACEHOLDER_CHARS = 23
  URL_PLACEHOLDER = 'x' * 23

Exit to root shell and restart the Mastodon processes, or simply reboot.

exit
systemctl restart mastodon*

[Guide]Let's Encrypt SSL/HTTPS Certificate for a unique port with HestiaCP

- Posted in Guides by

Introduction

In this tutorial, I will guide you through the process of setting up a let's encrypt ssl/https certificate (reverse proxy) on a unique port other than 80/443, example port:4545 on the root server for hosting using Hestia Control Panel (See installation URL given under prerequisites below). Hestia Control Panel is a popular open source web server control panel that simplifies the management of your website, email accounts, databases, and other hosting-related tasks. This tutorial is compatible with both VPS and Root Server offerings by netcup.

Assumptions:

  • You already have a sub-domain setup and the requisite service installed at the specified http port (example - http://sd1.domain.tld:4545).
  • You have the sub-domain setup with SSL/HTTPS (443) setup (example - https://sd1.domain.tld)
  • You have bare minimum knowledge of terminal, web servers, vhosts, reverse proxy.

The reading time of this tutorial is about 35 minutes; implementation will take approximately 60-70 minutes.

Background

The objective of Let’s Encrypt and the ACME protocol is to make it possible to set up an HTTPS server and have it automatically obtain browser-trusted certificates without any human intervention. This is accomplished by running an ACME client on a web server. To know more, visit Let's Encrypt. This also forms a part for use in Nginx reverse proxy configuration.

Forgejo is a self-hosted lightweight software forge (simple software project management). Easy to install and low maintenance, it just does the job.

In the world of open-source software, the story of how a project is governed is often as important as the code itself. Forgejo is a powerful testament to this fact. It is a “soft fork” of Gitea, created by a community of users and contributors to ensure that the project’s future remains in the hands of a non-profit, community-driven organization.

Born out of concerns following the creation of a for-profit company to manage Gitea, Forgejo’s mission is to be a truly free and open-source software (FOSS) forge, managed under the stewardship of the Codeberg e.V. non-profit. It is technically very similar to Gitea, but philosophically, it represents a commitment to community ownership and non-commercial governance.

Since Forgejo by default/design runs on port 4545 and many other projects also default to port 4545, I chose a different port (example 4545 here). This helps me keep it running in the background without conflicting with other applications. This was necessary for 2 more reasons:

  • Clean url everytime Example instead having to type or visit https://git.example.com:4545 every time, I will have a cleaner url as https://git.example.com.
  • Issue an HTTPS/SSL/TLS enabled URL and enjoy the higher level of security. Visitors & users of my site would also know they are safe.

Prerequisites

  • A server from netcup with latest Ubuntu 20.04/22.04/LTS; Debian 10/11/12/LTS or later installed (see the below URL) - use minimal mode of installation, also called clean installation. Installation Tutorial or the blog guide here.
  • A registered domain name
  • Access to your server

Step 1: Update your system

Before we begin, it's essential to ensure that your system is up-to-date. Log in to your server via SSH as the root user and run the following command:

For Ubuntu/Debian:

apt update && apt upgrade -y

Step 2: Add the necessary changes to the service (example git)

username@serverip:port

I created a normal subdomain at normal 80/443 ports with LE SSL generated. Then in the git app.ini (/etc/git/app.in) file, added this under [server]

nano /etc/git/app.ini
--------------
[server]
ENABLE_ACME = enable
HTTPS_PORT = 4545 ssl
ROOT_URL = https://git.domain.tld
-------------- **(save changes to the file by typing CTRL+X simultaneously)**
CTRL+X
Y
Enter

Then under nginx.conf ($HESTIADATA\conf\web\git.domain.tld\nginx.conf) I added

nano /$HESTIADATA\conf\web\git.domain.tld\nginx.conf
--------------
 location / {
     client_max_body_size 4096M;
     proxy_pass http://localhost:4545;
     proxy_set_header Connection $http_connection;
     proxy_set_header Upgrade $http_upgrade;
     proxy_set_header Host $host;
     proxy_set_header X-Real-IP $remote_addr;
     proxy_set_header X-Forwarded-For $proxy_add_x_forwarded_for;
     proxy_set_header X-Forwarded-Proto $scheme;
-------------- **(save via)**
CTRL+X
Y
Enter

Then under apache2.conf ($HESTIADATA\conf\web\git.domain.tld\apach2.conf) I added

nano /$HESTIADATA\conf\web\git.domain.tld\apache2.conf
--------------
     ProxyPreserveHost On
     ProxyRequests off
     AllowEncodedSlashes NoDecode
     ProxyPass / http://localhost:4545/ nocanon
-------------- **(save via)**
CTRL+X
Y
Enter

Then under apache2.ssl.conf ($HESTIADATA\conf\web\git.domain.tld\apache2.ssl.conf) I added

nano /$HESTIADATA\conf\web\git.domain.tld\apach2.ssl.conf
--------------
 < VirtualHost git.domain.tld:8443 https >
*****************************
*****************************
    ProxyPreserveHost On
     ProxyRequests off
     AllowEncodedSlashes NoDecode
     ProxyPass / http://localhost:4545/ nocanon
-------------- **(save via)**
CTRL+X
Y
Enter

I also enabled the following to ensure the proxy works:

 a2enmod proxy
 a2enmod proxy_http
 a2enmod proxy_balancer
 a2enmod proxy_wstunnel
 systemctl restart apache2

Then I restarted all services

 systemctl restart apache2
 systemctl restart nginx
 systemctl start git.service

I got the help from these:

APache SSL long record rrror

Let's Encrypt SSL certificate

Gitea reverse proxy - Apache HTTPD

Gitea reverse proxy - general conf

Gitea reverse proxy - NGINX

Someone's personal Forgejo guide

Conclusion

Awesome! You've successfully set up a let's encrypt certificate on a unique port other than the usual 443/8443.

Install Hestia Control Panel (Debian 12 Root Server)

- Posted in Guides by

I recently purchased a KVM root server from Netcup to finally move my FbIN domain and the related services there. Those being very resource hungry items, my current shared hosting setup was making my life a pain. It has been a place where I was restricted a lot, being shared resources, shared space, and everything. I even tried at home networking, but being CG-NAT, nothing worked, not even DDNS.

So, let us start with it.

Requirements: Writing for example KVM - RS 2000 G12 1M Rabatt (netcup) Operating System: Debian 12 Bookworm - Minimal Install Processor: AMD EPYC™ 9645 Processor cores: 8 dedicated RAM DDR 5 ECC: 16 GB Hard drive: 512 GB NVMe SSD Location: Europe Hestia URL: Getting Started Documentation | Generate Installation Script | WGET URL | List Of Installation Options

enter image description here


Note: Installer needs to be run as root. Also, Hestia must be installed on top of a fresh operating system installation to ensure proper functionality. If on a VPS/KVM, and there is already an admin account, either delete that default admin ID, or use --force to continue with the installation. See my custom installation script below for further details. Hestia only runs on AMD64 / x86_64 and ARM64 / aarch64 processors. It also requires a 64bit operating system! Hestia currently does not support i386 or ARM7-based processors.

Note: Never run a web or mail domain with the admin user.


Login

  • Login to your server via SSH/Terminal
  • Update your system apt update && apt upgrade -y

Download

  • cd /home
  • wget https://raw.githubusercontent.com/hestiacp/hestiacp/release/install/hst-install.sh

If the download fails due to an SSL validation error, please be sure you've installed the ca-certificate package on your system - you can do this with the following command:

  • apt-get update && apt-get install ca-certificates

Run this Installation Script

bash hst-install.sh --hostname 'examplepanel.domain.tld' --username 'admin' --email 'workingmail@domain.tld' --password 'strong&complexpasswordhere' --multiphp '8.2,8.3,8.4' --postgresql yes --sieve yes --webterminal yes --force

This command will force install Hestia in English with the following software:

  • Nginx Web Server
  • PHP-FPM Application Server
  • PostgreSQL & MariaDB
  • Database Server
  • IPtables Firewall + Fail2Ban Intrusion prevention software
  • VSFTPD FTP Server
  • Exim Mail Server
  • Dovecot POP3/IMAP Server
  • Sieve
  • ClamAV
  • API
  • Web Terminal
  • Port 8083

Once installed, you can start accessing your installation at: https://panelexample.domain.tld:8083 or http://your.public.ip.address:8083

Login Page

enter image description here

Control Panel Homepage

enter image description here

Enable two-factor authentication (2FA) for the admin user -- Documentation

Since the admin user has full control on the server, as well as elevated privileges, it is greatly recommended that you enable 2FA on this account. To access your account settings, click the user button in the top right.

  • In your account settings, check the box labeled Enable two-factor authentication.
  • Click the Save button in the top right.
  • Scan the QR code using an authentication app.
  • Save your Account Recovery Code somewhere safe, in case you lose access to your authenticator.

To secure your account further check out the following tutorial (applies to everyone using linux): Secure Linux Server

Setting self hosting at home & related horrorsssss

- Posted in Club Frenzy by

So, this is what I call horrrrrorrr of horrorrsss.. Don't trust me? Try it yourself, when you are not a tech-funkiee.

backbone-shh

So, it all started with my mind going open source, few years back. I have been trying hard, but with limited resources, finance being a hurdle and more, I started saving as much to as little as possible, cutting down on a lot of my expenses. It took me around 4 years to gather money up so that I could go for a couple of domains and get them up for the next 10 years at least, while making sure, I save enough for the next 10, and next 10 and so on.

Now, while I was saving money, I was in parallel lookigng for guides and reading through to find out what all are needed. Domain [check], DNS [check], certificates & privacy [check], hosting [woah... no check].

Now, I was aware we needed apache2, virtual hosts, nginx and whatsh** for a lot and all of this, and not to forget, languages (not spoken, but written), html, php, and .....

Anyways, not dragging this one out here, and I will speak of it on my other post in a few days time, back to this post.

For the last 3 weeks, I am kind of glued to my laptop.

HP Notebook from 2014 build year, Li-on battery (heats like hell), i3-5005U CPU, L2 cache, 16GB RAM, 1TB HDD (formatted and am running MX 21.3 since 3 days now), 248GB SSD (currently running W11, fully modified, no cr**), KVM disabled, Intel 5500 Graphics, and the long list. You get the gist, I am sure.

What has been eating me is this: I paid for unlimited (even though shared hosting), and now everything has been limited, badly. I can run very limited stuff, and that too if one job runs, and has say number of processes, the system automatically gets overrun and a lot of other things stop, ruined, messed up.

Anyways, so, I went over to internet, and searched and searched, and searched. Was getting very difficult to find me resources which cater to either something in recent times, and something which can at least give me basic idea and steps to run things.

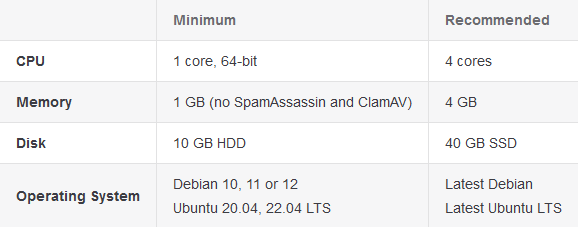
I found few sites, few blog posts, few even detailed guides, but 90% of those were related either to only Windows based hosting, and or Ubuntu/Debian Server based hosting. There were many CentOS/Rhel etc based as well, but they were so aged, that even older generation would call it the era of eons...

Now, while I had in mind what I needed, I am not a technical person at core. I understand concepts, I can read and probably modify codes to make things work, but if you get tooooo technical, I will either ask questions, or might jump to my own understanding, thereby messing it up completely(unfortunately at times), and other places where I can find the right information at the appropriate time.

So, 3 nights back, or rather 4 nights to be precise at the time of writing this paragraph, I started fiddling with my MX OS, and did soooo many things as guided here, even though it is old, it is the only one I could find with proper guidance and mentioning with details, thereby helping me get some understanding. Mind it, I had this site with me for the last 4 weeks, but I was trying to get a proper linux build to try it on. The horrors of that and more during the MX setup is another story and for some other post.

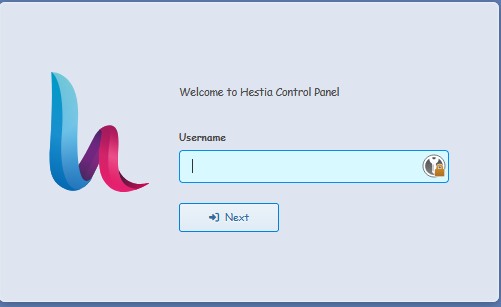
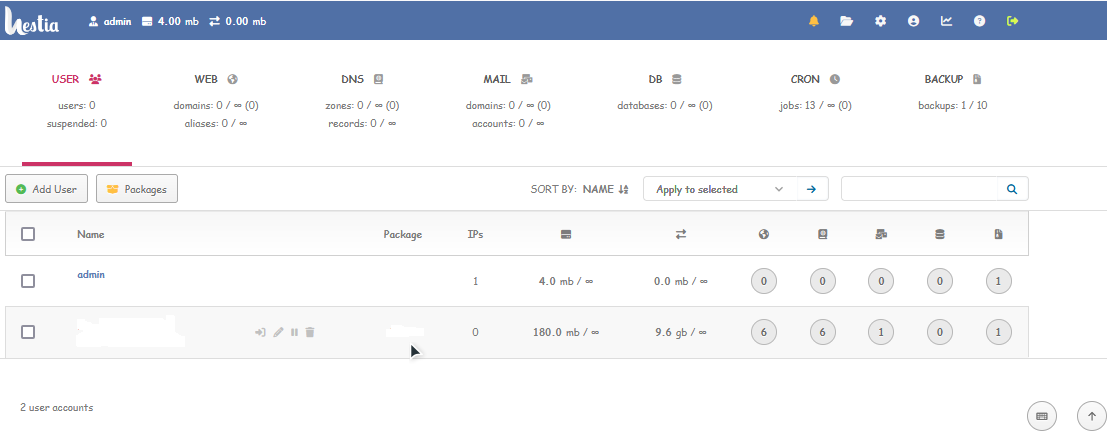
So, I started fiddling, and went on and on with everything that I could get from those steps, as I do understand a bit of terminal(ogy), and can glide through it, with much of it not requiring a hand. When I finally thought at 0128 hours my time that I finally had done it, is when I stumbled upon more stupidity in life. My sample site though had everything in place was still not showing up, and instead, I found another stuff gawking at me with all its might..

Imagine my state. I was anyways tired, been working the whole day and then taken to this plate of self-hosting surge of energy, I worked from 20:40-21:00 and at 0128 hour the final hour made me lose it. Fed up, I got so irritated, I went to various sites trying to get a solution to it. Alas, my boding went till 0350, when I finally gave up and finallllly went to get some sleep.

What did I fumble onto, which made my life so horrific for the next 2-2.5 hours? What led me to go on still, and kind of stay up to find a solution no matter what for those 2+ hours?

Ohh, and what about my reaction, my understanding, of the final output at 01:28 hours? What was it?

Find out this and more on the part II of this mind boggling thread (coming soon).

Keep a tap on this post for the linkage and updates.

Till then, keep your mind free to be more boggled later on!!!


#### Updated: 25.06.2023

So, the horror stood me up on my path and left me astray. Finally 2 weeks ago, I gave up all the hope of self-hosting from my home.

Chasers upon chasers, static IP always routing through to sub-router and the NOC team were never able to solve it.

That shows, what level of study they did and what level of knowledge I have. I was guiding them the whole time and explaining to them why something was happening.

So, my local ISP did give me a static IP, however, for reasons they were never able to find, the IP was routing to the middle router and not opening up WWW for me. No amount of port forwarding, or for that matter no amount of headaches made it any simpler, or was even able to resolve it.

The only time it would open up was when it was on Dial-UP or ADSL mode (direct PPPoE) and not via router PPPoE, MSDL, or even Wi-Fi Route.

I and one of the local team member banged our heads for almost 3-4 weeks (and you know, hardly anyone works after 6PM, or that the tea breaks are for 1 hour and lunch breaks are for 2 hours). I have my office work too, and blah blah blah...

Anyways, after going over so many trial-error methods (almost 12-15 times we tried in various manners), that the local guy gave up and me too started trending for me.

So, the part of all this brick in the wall is: My Self-Hosting can only work, or let me put it this way, can only be tried again if I meet at least the below stated criteria:

*New ISP, probably some company that has a better NOC team members *New Laptop (my current one is a mess, and may go dead any day now) *Rather, a desktop, which can be a better choice (my first ever was an assembled one, and I still have few things from that desktop) *Money.... The biggest trouble for me since ages. Taxes are eating up most of my income and I am not getting any younger anyways...

Anyways, Adios on this one for now!!!

Self-Hosting!

- Posted in Computers! by

Self-Hosting!!!

Self Hosting is a form of running your own website or application by setting up a server and network yourself. Self-hosting is also the activity of having and administrating your own server, typically at home, to host your personal data and services yourself instead of relying exclusively on third-parties. For instance, you can self-host your blog, such that it 'lives' on a machine that you have control of, instead of having it on somebody else's computer (a.k.a. The Cloud) in exchange for money, seo-advertisement or selling of your private data.

Self-hosting ideally implies owning a server. A server is a computer which is typically accessible on the network 24/7, and usually does not have any screen or keyboard (it is instead controlled remotely). Contrarily to a popular belief, a server is not necessarily a huge and extra-powerful machine: nowadays, a small, ~$30 ARM board is adequate for self-hosting. However, this does not mean you cannot host anything on your own laptop/desktop.. Of course you can anytime.

Self-hosting is not about making "your Internet" more secure and does not provide anonymity by itself. Instead, it is about being autonomous, and in control of your services and data - which also means being responsible for them.

Why should you host yourself ?

You believe in a free, open and decentralized internet. In a centralized internet, private companies and government can spy, analyze and influence people by dictating how they connect with each other, and by filtering content. There are many hosting applications/servers developed by a community who believe in an open and decentralized internet, and we hope that you do, too! So, find them in the world of computers...

You want to have control of your data and services. Your pictures, chat messages, browsing history, and that text you are writing for school, have nothing to do on somebody else's server (a.k.a. The Cloud). They are part of your private life, but also part of your family's life, your friend's life, and so on. These data should be managed by you, not a random company in the US who wants your data to analyze them and sell the results.

You want to learn about how computers and the Internet work. Operating your own server is a pretty good context to understand the basic mechanisms at the heart of operating systems and the Internet. You might have to deal with command line interface, network architecture, DNS configuration, SSH, and so on.

You want to explore new possibilities and customize things. Ever dreamed of running a Game server for your friends, or a persistent IRC or XMPP client? With your very own server, you can manually install and run virtually any program you want, and customize every bit.

Why should you not host yourself ?

Self-hosting requires some work and patience. Hosting yourself is a bit like growing your own garden or vegetables: it requires work and patience. While those few open source images for home servers aim to do all the hard work for you, self-hosting still requires that you take time to learn and configure a few things to setup your server properly. You will also need to perform maintenance tasks (such as upgrades) from time to time, or to ask for support if some things break.

With great servers comes great responsibilities. Operating a server means that you are responsible for the data you are hosting. Nobody will be able to recover them for you if they get lost. Very few servers (images and open source images) provide backup features, and if they do, you should use the feature regularly to backup the configurations and data you care about. You should also keep an eye on security news and recommendations so that your server or critical data don't get compromised.

Quality and performance probably won't be as good as premium services. You should try and use those open source host images (and most of the applications packaged for it) which are free and have imbibed open-source software, developed by communities of people in their free time and on the basis of best effort. There of course is no absolute guarantee that those softwares will work in every possible circumstance. The performance of your self-hosted server is also related to its CPU and RAM, and to the available internet connectivity.

Edit/Update: 25.04.2023 - Read about my experience of self-hosting setup at home in the thread here.